Thursday, April 30, 2020

Remodeling the Basement Craft Room Part 2

The lighter shade on the wall is the new paint color.
The brown rectangle under the window is a peg 
board.

LED ceiling fixture mock-up
This April started with repairing two holes in the walls on the crafts room south side.  One hole was opened years ago when my water pipe froze.  At the time I was very lucky the pipe was not completely frozen and did not cracked.  The plumber opened the wall and used a hair dryer to thaw it.  For years I just hid the opening by hanging a quilt over it.  The other hole was made when the internal connection was moved to above where the upper cabinets are going.

I also needed to move the electric baseboard higher on the wall causing some repair work.  The reason I needed to move the baseboard is because there was not enough room between the baseboard and the floor to install the vinyl flooring.  Once the repair work was done, I finally got to paint the room.  I looked at a lot of different colors and shades ended up with the same color but a shade lighter.

The next project was to hang the second LED light fixture.  The first one I hung I had trouble try to align fixture, so it was parallel with the support beam down the center of the ceiling.  This time it dawned on me that a mock-up would make life much easier.  It worked very well and took less time too.
TV mock-up.
Now it was time to mount the TV and hang the upper cabinets on the walls.  Since the mock-up worked so well with the LED light fixture, I made a mock-up for the TV height since I wanted the TV high enough so it could be seen easily while working on the sewing machine or cutting fabric.

I did the same thing with the upper cabinets.  The picture below is example of how to hang upper cabinet when social distancing due to the pandemic.  I put the cabinet on a 5-foot file cabinet and used wooden boards to shimmy the cabinet up to the correct height and level it.

While working on the cabinets I had a helper inspecting my work his name is Snuggles.  He had a great time chasing his tail on the ladder and climbing in the hung cabinets.
Snuggles
The mounted TV and hanging upper cabinets.

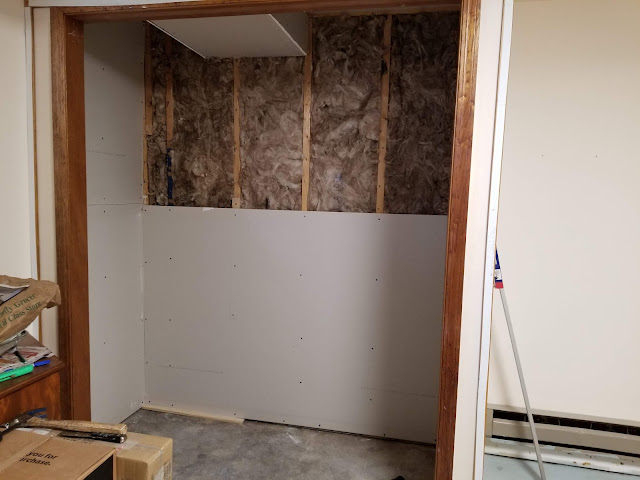
The last two weekend in April I spent insulating and dry walling the old oil tank closet.  The first major change I made in the house was to replace the oil furnace with a gas furnace and part of the job required the furnace installers to remove the oil tank.  The previous owners build a closet around the oil tank, but the closet was never dry walled.  The first weekend I framed around the duct work in the closet ceiling.  I put one-inch foam insulation between the cement walls and then fiberglass insulation.
Insulating  the closet with the 1-inch foam.
The framing around the duct work and finishing the insulating with fiberglass batts.
 The last weekend I got three quarters of the closet dry walled.  In May I hope to get the taping and painting done in the closet and start working on the floor.

Saturday, March 21, 2020

Remodeling the Basement Craft Room Part 1

The craft room south side newly painted
with a new LED light fixture
This winter project started in the spring 2019 when I brought cabinets to put up on the east wall of the basement craft room.  I was hoping to get an electrician over the summer to move the electric outlet up the wall because the lower cabinets would cover them up.  No one call me back, so I waited until after Christmas to try again.  The person I contacted believed he could fit me and came over to view what I need done but he pulled out when a contractor called him with a large job.  He was nice enough to refer me to another electrician located in my town.  This tradesman was able to fit me in a within two weeks after I contacted him.

Since I finally got an electrician to do the job March, I had a long list of what I wanted upgraded.   This list involved:
  1. My bedroom: add two outlets with USB on each side of my bed.
  2. Guest Bedroom: add one outlet along the south wall.
  3. Living room: add an outlet on the north wall and replace an outlet with USB where my phone charger is (this could not be done because they could not pull a new grounded wire to the outlet.)
  4. Dining room: add an outlet with USB where my computer sits.
  5. Front porch: replace outdoor outlet with a grounded one.
  6. Unfinished side of basement: 
    1. Add a 4-plug outlet under shelving where I have my hand tools battery rechargers.
    2. Add outlet next to my worktable.
    3. Add outlet next to water softener.
  7. Basement Craft room:
    1. Move and replace outlet with an outlet that includes USB above the lower cabinets on the south side of the east wall
    2. Move outlet and replace with 2 plug outlet and a 4 plug USB outlet above the lower cabinets on the north side of the east wall
    3. Added an outlet above the upper cabinets to place the internal box and the Wi-Fi above cabinets.
    4. Add outlet on north wall where I will hang the large screen TV. 
Guest Bedroom turned in a storage space.
I made sure all the furniture was moved out of way when they came and then I cleaned up after them so they could just do the electrical work.  It took two men 6 hours to finish the job.  It took me two weeks to put everything back together since house was already torn apart, I decided it needed a proper spring cleaning.

The same day the electricians were working on the house, I spent sometime at the phone company to make an appointment to have my internet connection moved above the upper cabinet and next to the newly installed electrical outlet.  The phone company completed the job the follow week and it took him only a half hour to get the job done.


While I was trying to line up an electrician, I managed to paint the craft room south side and brought two LED fixtures to replace the bare ceiling light bulbs on each side of the room.  In the meantime, I decide if I am doing all this work I might as well install a vinyl plank floor in the room.  This means I just cannot move all the stuff in the room from one area to another while working on it.  I need to remove everything from the room to lay the floor.  

After cleaning the Guest room, I had about two weeks to enjoy because now it is filled with the stuff from the craft room and that is not the only area.  There is more under my bed and the aisles in the unfinished basement are lined with furniture.  I now only have two files cabinets, a drafting chair and half of the assembled cabinet boxes in the room.

The picture to the right is the unfinished section of the basement where I stuffed more things from the craft room and the base cabinets are what is stored under the stairs.  I have done more work in April but that will be for another posting.


Friday, March 20, 2020

Painting the House Exterior

The last time I wrote about painting the exterior was on September 20, 2011.   I been taking care of family and working so I had very little time to work on the house.  The next time I got back into scraping, sanding, priming, caulking and painting was in 2014.  I was working on the house northeast side back wall.  This wall has the electrical line attached along with meter before the line goes to the fuse box in the basement.  I did not like scraping, sanding and painting so near to that line.  I spent a lot of time scooting up and down the roof that I had to throw out several pairs of holey work pant.  I only managed to get finish preparing and priming the lower 2/3 of the wall before winter.


I did not get back to working on the siding until 2016 because in the summer 2015 I make a trip up to Alaska one more time to spread my father's ashes along the Kenai Peninsula.  My roof was starting to look bad, so I needed to finish working on the siding that were above the back and front porch roof lines.  That year I finished working on the siding on the back wall and scraped and sanded the siding above the front porch roof.


I finished priming and painting the siding above the front porch in 2017.  The time I planed work on the siding in 2018 instead I used the time stripped out everything on the first floor of my Mother's house because her house was destroyed in a flood that Fall.

My mother's house had a foot to a foot and half of water inside the house.  We were lucky, I manage to get everything upstairs and she did not lose any family heirlooms.  Since then I finally finished painting all the siding above a roof line but I had a problem getting my first roofer to show up and do the work.

My mother's house.
 
In 2019 I finally got my new roof and also have them install new leaf guard gutters.  I spend a lot of time working on the east facing back porch and the front of the house because I did not want to get paint on the new gutters.  The gutters were put up before I could finish but the installer show me how to take them down without damaging them.  The only gutter I could not put down was the gutter behind the house number.  The installer put the screw inside the gutter and the leaf guard cover it, so I wrapped Sarah wrap around the downspout to keep it nice.  The two pictures shown how far I got last year.

This year I plan on finish scraping the front porch.  I not looking forward to scraping the porch's beam board ceiling, but it needs it.  I got to preparing and painting the east side of the back porch up to the gable, I also need to put an air vent to keep the roof cool so the shingles will last longer than 15 years.

When I started painting the house, the guys at work would tease me that by the time I finished I would need to start all over.  I am nowhere done, and I am starting to see I may need to touch up the first area I painted.