Thursday, April 30, 2020

Remodeling the Basement Craft Room Part 2

The lighter shade on the wall is the new paint color.
The brown rectangle under the window is a peg 
board.

LED ceiling fixture mock-up
This April started with repairing two holes in the walls on the crafts room south side.  One hole was opened years ago when my water pipe froze.  At the time I was very lucky the pipe was not completely frozen and did not cracked.  The plumber opened the wall and used a hair dryer to thaw it.  For years I just hid the opening by hanging a quilt over it.  The other hole was made when the internal connection was moved to above where the upper cabinets are going.

I also needed to move the electric baseboard higher on the wall causing some repair work.  The reason I needed to move the baseboard is because there was not enough room between the baseboard and the floor to install the vinyl flooring.  Once the repair work was done, I finally got to paint the room.  I looked at a lot of different colors and shades ended up with the same color but a shade lighter.

The next project was to hang the second LED light fixture.  The first one I hung I had trouble try to align fixture, so it was parallel with the support beam down the center of the ceiling.  This time it dawned on me that a mock-up would make life much easier.  It worked very well and took less time too.
TV mock-up.
Now it was time to mount the TV and hang the upper cabinets on the walls.  Since the mock-up worked so well with the LED light fixture, I made a mock-up for the TV height since I wanted the TV high enough so it could be seen easily while working on the sewing machine or cutting fabric.

I did the same thing with the upper cabinets.  The picture below is example of how to hang upper cabinet when social distancing due to the pandemic.  I put the cabinet on a 5-foot file cabinet and used wooden boards to shimmy the cabinet up to the correct height and level it.

While working on the cabinets I had a helper inspecting my work his name is Snuggles.  He had a great time chasing his tail on the ladder and climbing in the hung cabinets.
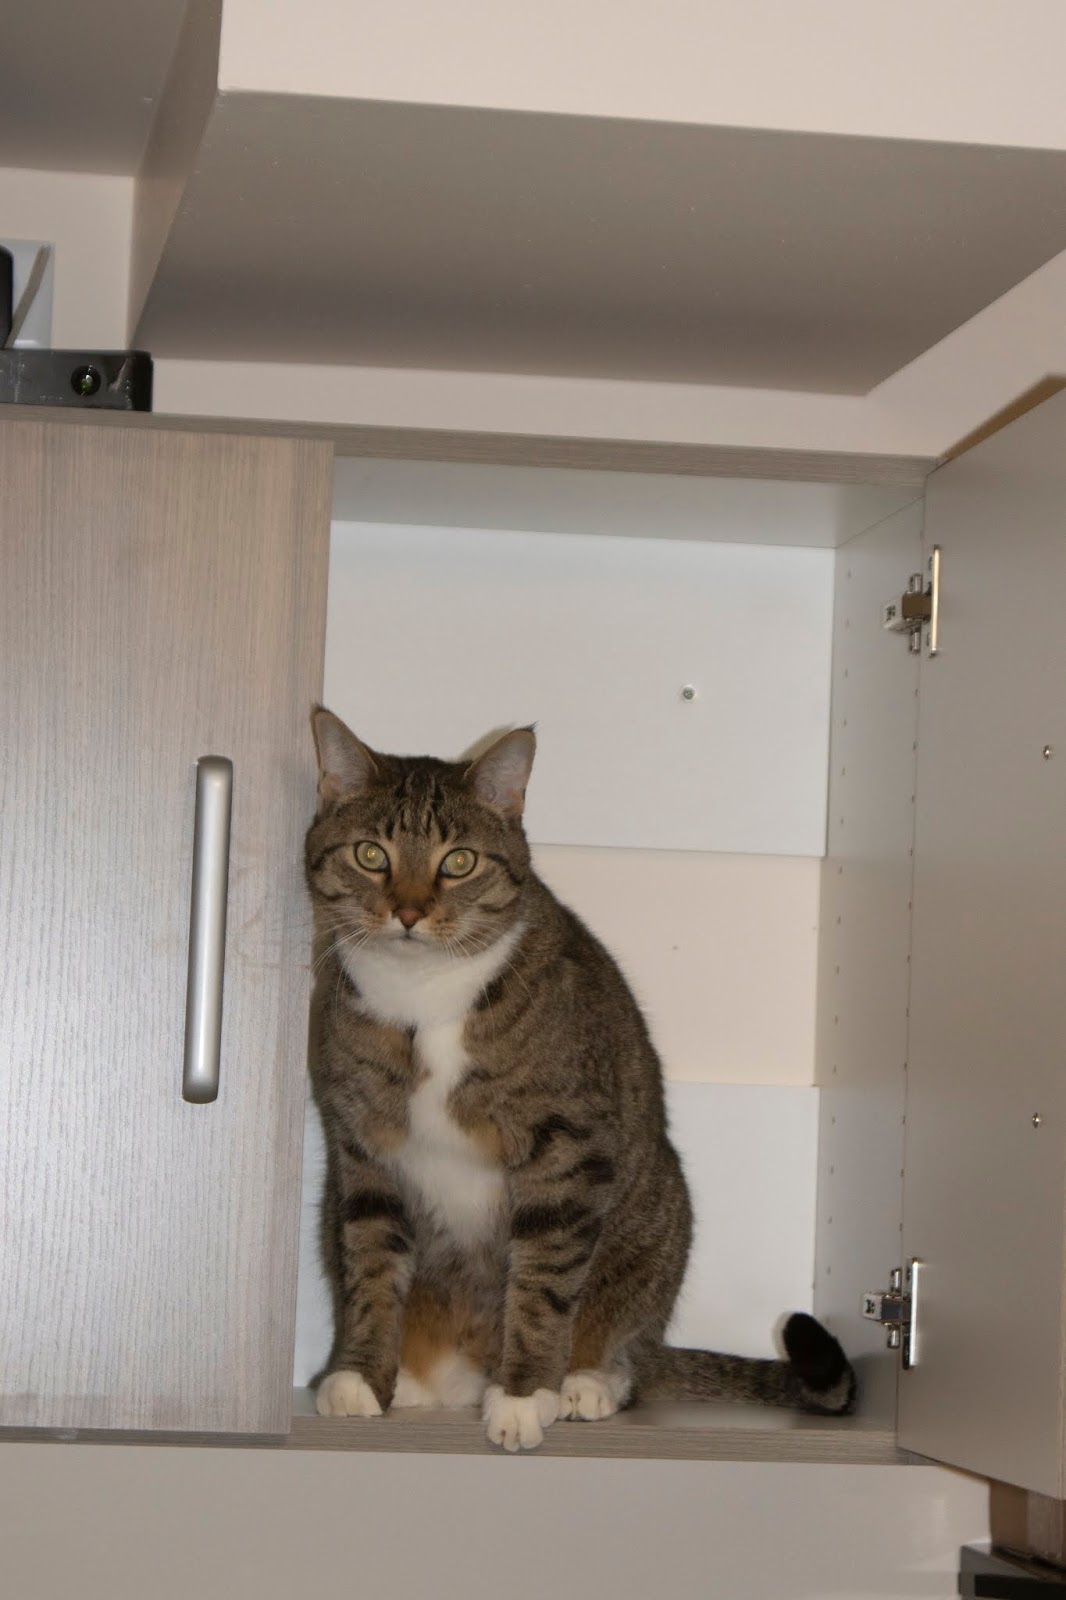
Snuggles
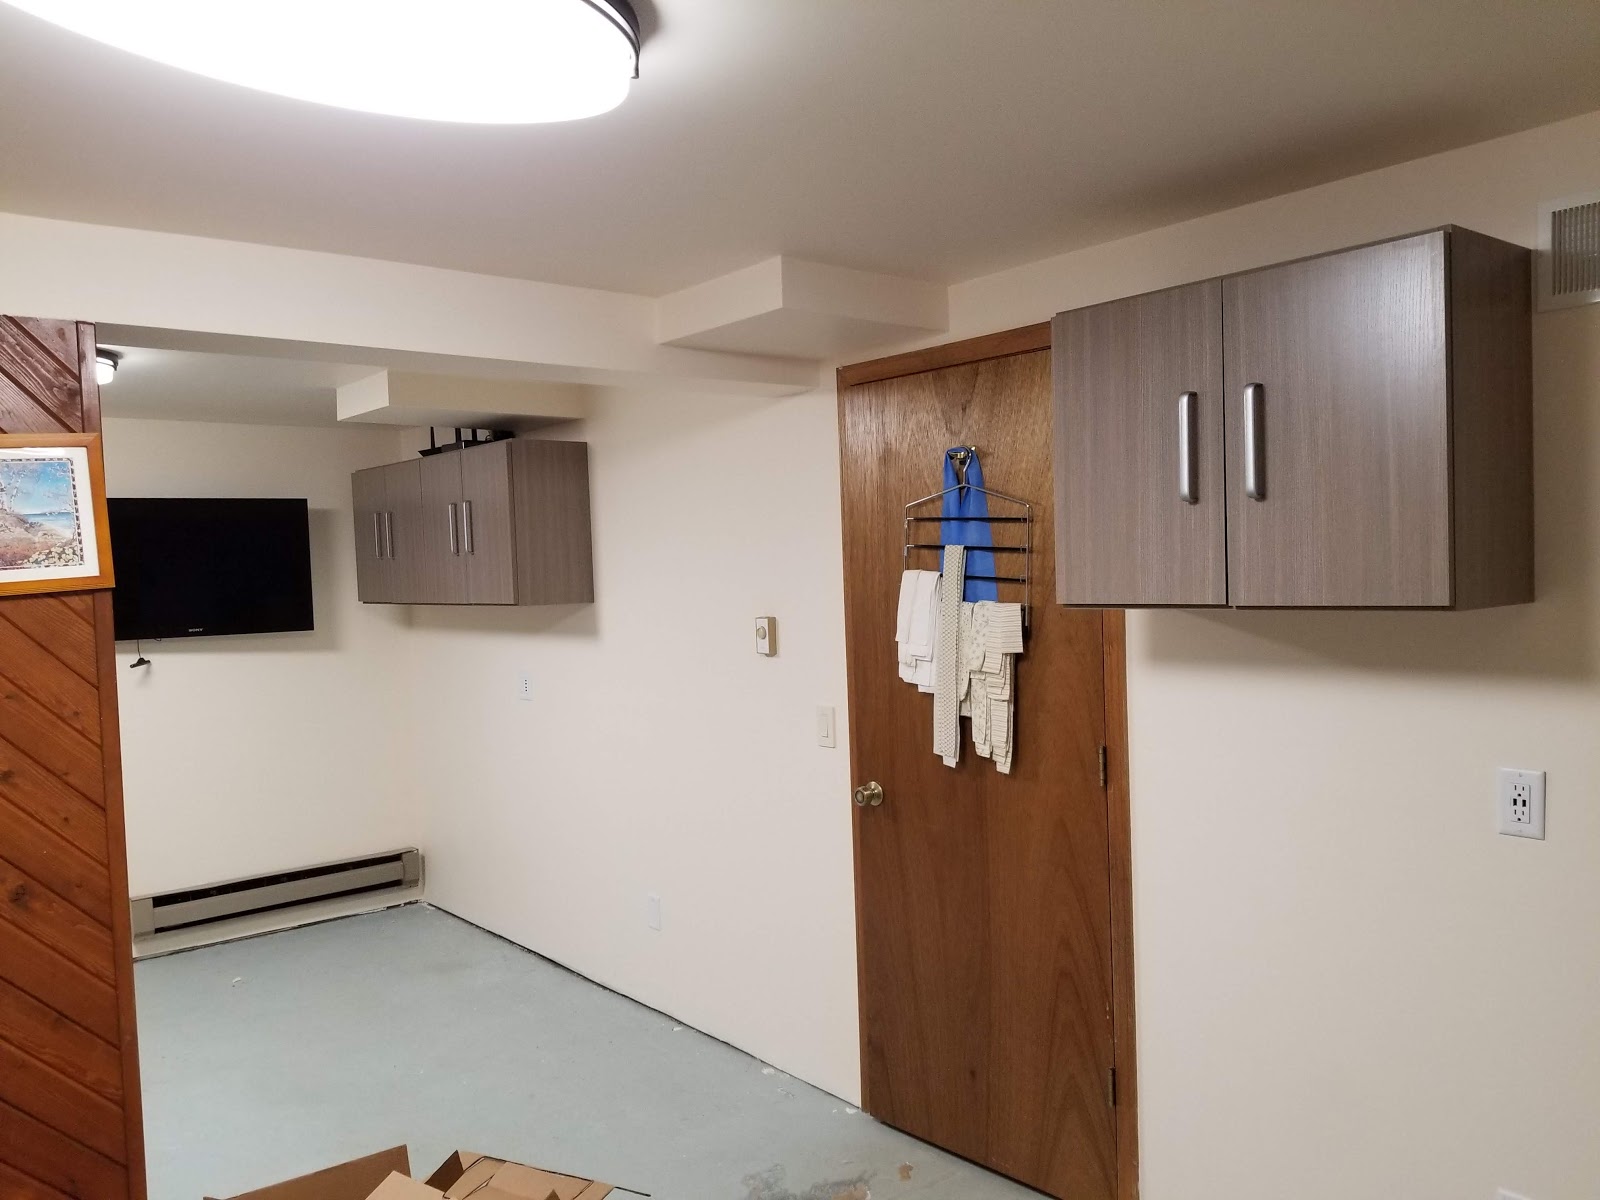
The mounted TV and hanging upper cabinets.

The last two weekend in April I spent insulating and dry walling the old oil tank closet.  The first major change I made in the house was to replace the oil furnace with a gas furnace and part of the job required the furnace installers to remove the oil tank.  The previous owners build a closet around the oil tank, but the closet was never dry walled.  The first weekend I framed around the duct work in the closet ceiling.  I put one-inch foam insulation between the cement walls and then fiberglass insulation.
Insulating  the closet with the 1-inch foam.
The framing around the duct work and finishing the insulating with fiberglass batts.
 The last weekend I got three quarters of the closet dry walled.  In May I hope to get the taping and painting done in the closet and start working on the floor.

Saturday, March 21, 2020

Remodeling the Basement Craft Room Part 1

The craft room south side newly painted
with a new LED light fixture
This winter project started in the spring 2019 when I brought cabinets to put up on the east wall of the basement craft room.  I was hoping to get an electrician over the summer to move the electric outlet up the wall because the lower cabinets would cover them up.  No one call me back, so I waited until after Christmas to try again.  The person I contacted believed he could fit me and came over to view what I need done but he pulled out when a contractor called him with a large job.  He was nice enough to refer me to another electrician located in my town.  This tradesman was able to fit me in a within two weeks after I contacted him.

Since I finally got an electrician to do the job March, I had a long list of what I wanted upgraded.   This list involved:
  1. My bedroom: add two outlets with USB on each side of my bed.
  2. Guest Bedroom: add one outlet along the south wall.
  3. Living room: add an outlet on the north wall and replace an outlet with USB where my phone charger is (this could not be done because they could not pull a new grounded wire to the outlet.)
  4. Dining room: add an outlet with USB where my computer sits.
  5. Front porch: replace outdoor outlet with a grounded one.
  6. Unfinished side of basement: 
    1. Add a 4-plug outlet under shelving where I have my hand tools battery rechargers.
    2. Add outlet next to my worktable.
    3. Add outlet next to water softener.
  7. Basement Craft room:
    1. Move and replace outlet with an outlet that includes USB above the lower cabinets on the south side of the east wall
    2. Move outlet and replace with 2 plug outlet and a 4 plug USB outlet above the lower cabinets on the north side of the east wall
    3. Added an outlet above the upper cabinets to place the internal box and the Wi-Fi above cabinets.
    4. Add outlet on north wall where I will hang the large screen TV. 
Guest Bedroom turned in a storage space.
I made sure all the furniture was moved out of way when they came and then I cleaned up after them so they could just do the electrical work.  It took two men 6 hours to finish the job.  It took me two weeks to put everything back together since house was already torn apart, I decided it needed a proper spring cleaning.

The same day the electricians were working on the house, I spent sometime at the phone company to make an appointment to have my internet connection moved above the upper cabinet and next to the newly installed electrical outlet.  The phone company completed the job the follow week and it took him only a half hour to get the job done.


While I was trying to line up an electrician, I managed to paint the craft room south side and brought two LED fixtures to replace the bare ceiling light bulbs on each side of the room.  In the meantime, I decide if I am doing all this work I might as well install a vinyl plank floor in the room.  This means I just cannot move all the stuff in the room from one area to another while working on it.  I need to remove everything from the room to lay the floor.  

After cleaning the Guest room, I had about two weeks to enjoy because now it is filled with the stuff from the craft room and that is not the only area.  There is more under my bed and the aisles in the unfinished basement are lined with furniture.  I now only have two files cabinets, a drafting chair and half of the assembled cabinet boxes in the room.

The picture to the right is the unfinished section of the basement where I stuffed more things from the craft room and the base cabinets are what is stored under the stairs.  I have done more work in April but that will be for another posting.


Friday, March 20, 2020

Painting the House Exterior

The last time I wrote about painting the exterior was on September 20, 2011.   I been taking care of family and working so I had very little time to work on the house.  The next time I got back into scraping, sanding, priming, caulking and painting was in 2014.  I was working on the house northeast side back wall.  This wall has the electrical line attached along with meter before the line goes to the fuse box in the basement.  I did not like scraping, sanding and painting so near to that line.  I spent a lot of time scooting up and down the roof that I had to throw out several pairs of holey work pant.  I only managed to get finish preparing and priming the lower 2/3 of the wall before winter.


I did not get back to working on the siding until 2016 because in the summer 2015 I make a trip up to Alaska one more time to spread my father's ashes along the Kenai Peninsula.  My roof was starting to look bad, so I needed to finish working on the siding that were above the back and front porch roof lines.  That year I finished working on the siding on the back wall and scraped and sanded the siding above the front porch roof.


I finished priming and painting the siding above the front porch in 2017.  The time I planed work on the siding in 2018 instead I used the time stripped out everything on the first floor of my Mother's house because her house was destroyed in a flood that Fall.

My mother's house had a foot to a foot and half of water inside the house.  We were lucky, I manage to get everything upstairs and she did not lose any family heirlooms.  Since then I finally finished painting all the siding above a roof line but I had a problem getting my first roofer to show up and do the work.

My mother's house.
 
In 2019 I finally got my new roof and also have them install new leaf guard gutters.  I spend a lot of time working on the east facing back porch and the front of the house because I did not want to get paint on the new gutters.  The gutters were put up before I could finish but the installer show me how to take them down without damaging them.  The only gutter I could not put down was the gutter behind the house number.  The installer put the screw inside the gutter and the leaf guard cover it, so I wrapped Sarah wrap around the downspout to keep it nice.  The two pictures shown how far I got last year.

This year I plan on finish scraping the front porch.  I not looking forward to scraping the porch's beam board ceiling, but it needs it.  I got to preparing and painting the east side of the back porch up to the gable, I also need to put an air vent to keep the roof cool so the shingles will last longer than 15 years.

When I started painting the house, the guys at work would tease me that by the time I finished I would need to start all over.  I am nowhere done, and I am starting to see I may need to touch up the first area I painted.

Tuesday, October 22, 2019

Time to Focus on the House Again

Well it has been quite a few years since I have posted anything.  Family matters have kept me busy and away from working on the house most of time.   Here is an update on closet projects I found time to do these last 6 years.  In May 2013 I hired a carpenter to divide the guest room closet to make a linen closet opening into the hallway next to bathroom.  The guest bedroom closet has approximately 2 feet dead space that was created into a linen closet.
The hallway wall where the new linen closet
opening will be made.
The dead space in the guest bedroom closet.
The carpenter did a nice job dividing the closet, I just ask him to put up the drywall and I would finish the taping to save money.  
The new wall in the guest bedroom closet
The new linen closet


Unfortunately, the linen closet and the guest bedroom stayed this way until this year.  Other responsibility and projects took a high priority, this year I finally became tired of unorganized closets.  So I tackled putting in closet organizer in the guest bedroom, linen closet and a closet in my craft room.  The first closet I worked on was the linen closet.  I finished putting mud over the tape and nails then painted before I hung the closet organizers.  I did the same for the guest bedroom closet.

Guest Bedroom Closet 
Linen Closet
When I first moved in, I removed the bedroom closet organizer in it and until this year I never used for clothing.  It was basically a place to store junk.  It is nice to get the clothes I stored in the craft room into my guest closet.  Putting the closet organizer into the linen closet greatly increase the storage room and allowed me to organize it better.  I am still not done with the linen or guest bedroom closets.  The bedroom closet needs to be trimmed with old yellow pine then shellacked.  The linen closet door needs to be stripped and shellacked before it is done.

The closet in the craft room now holds some of my craft supplies instead of clothing.  The closet is part of this room remodeling.  This past spring I brought cabinets which need to be hung but first I need to hire an electrician to move and add outlets because the base cabinets will cover them.  Lastly, I need to paint the walls before I hang them.  Now back to the closet, I am using this closet to stored quilt projects and some on my fabrics.  I put 18 closet poles to hang my upholstery fabric that are wrapped on cardboard rolls at the bottom.  I hope to get more done in the craft room this winter.

Craft room closet


Sunday, June 16, 2013

Alaska Highway: Rancheria, Yukon to Tok Alaska

Moose Crossing Sign just north of Rancheria
I left Rancheria at 5:00 AM since I could not sleep and it started to rain.  I hate taking down a campsite in the pouring rain so I wanted to get the car packed before the rain became a steady steam.  I was planning to have breakfast in Teslin.  On the north side of the bridge there is the Yukon Motel and Restaurant, I remember eating there in 2006 when my Father and I drove the highway and their breakfast is as good as remembered it.  I made two stops before reaching the restaurant.  I just had the take a picture of another Moose Crossing sign; sorry I just cannot help myself I love those Canada's Signs.  The next stop was the turnoff above Nisutlin Bay Bridge where I took my time to admire Teslin Lake and the surrounding view.

Nisutlin Bridge from Teslin Rest Area
Teslin Lake north of the village.
I spent the day driving through different storm systems.  As I said earlier, the day started off with rain and just north of Teslin the skies clear up.  The second front can be seen in the pictures pushing over the mountains around the 900 mile Historical Marker.  Soon after leaving Destruction Bay I encountered rain all the way to Tok, Alaska.  In the spring of 2012 the Yukon had its fair share of bad weather and on June 8, 2012 the highway was shut down from Lake Watson to Whitehorse for 5 days due to flash flooding.  The road was washout in several sections along the route.  The flood waters were from a record rainfall and the snow melting off the mountains.  Whitehorse ran out of food and they had to flying supplies in since it was the only way into the town.  The road was repair just enough to allow traffic down the highway after 5 days, semi trunks were allow to travel the road the first day so Whitehorse could receive their badly needed supplies.

Clearing Sky between Teslin and Historical Mile Post 900
Elk Crossing Sign
The drive between Teslin Lake Village and Haines Junction was nice but my eyes kept drifting toward the distance mountains.  Some where between Jack’s Crossing and Haines Junction the Kluane and Icefields Mountain Ranges are visible from the highway.  The both ranges are a part of the St Elias Mountains.  At mile mark 986 there is a rest area that had information about Mount Kennedy and Mount Hubbard but by then it had clouded up once more and the peaks were hard to identify.  Canada declared these mountains as Kluane National Park and Reserve in 1972.  The park includes both the Icefield Range and Kluane Range of the St. Elias Mountains.  These mountains include the largest non-polar ice field in the world and the fields are the remnants from the last ice age.  Kluane is one of four parks included in the  UNESCO World Heritage Park formed in 1979.  This Heritage Park includes Wrangell-St Elias National Park and Preserve, Alaska; Kluane National Park and Reserve, Yukon Territory; Tatshenshini-Alsek Provincial Park, British Columbia and Glacier Bay National Park, Alaska.

St. Elias Mountains - Kluane Range: This is my first good view of the mountains and icefields on them.
Mount Kennedy and Mount Hubbard Rest Area
Can you find both Mt. Kennedy and Mt. Hubbard in the picture above.
A close up of the mountains.
Wild Flax were blooming along the Rest Area.
Time to hit the road again and head toward the mountain.
I pull off the road several times to take in the views along Kluane Lake.  The fields were filled with wild flowers and I stop to identify what types of flowers were blooming.  Soon after I stopped in Destruction Bay for gas and took some more pictures on the shores of Kluane Lake.  Destruction Bay has an interesting history on how it received its name.  This village was first developed as a campsite during the construction of the highway in 1940 and soon after the camp was completed it was destroyed in a wind storm.  Most of the road equipment was blown into the bay hence it name Destruction Bay.   I left Destruction Bay behind and pass through Burwash Landing before I drove through the worst section of the highway I have ever driven on.  The highway was like a wash board all the way to the US boarder.  The road was a roller coaster with pot holes in it.  So you are going up and down along with side by side for the next 138 miles.  The weather was cold and raining during the drive so I did not feel like getting out of the car to strength the legs and did not stop until I entered Beaver CreekHere I stopped for lunch and to fill the car up with gas.  The border was still another hour away (I may be stretching the time here) with more wash board like road left to travel.

The Kluane Lake view point in Kluane National Park
The lake and mountains from the view point.
The drive along the Kluane Lake changed greatly from 2006.  The road was rebuild and much of the shoreline
was filled for the new road.
A section of unaltered shoreline along Kluane Lake.
Kluane National Park: A field of wild flower along side the Alaska Highway.
Kluane National Park: Northern Yellow Locoweed
The Northern Yellow Locoweed flower.


Kluane Lake Shore in Destruction Bay
Kluane Lake looking northwest across the lake in Destruction Bay.
When I finally reached the border there were five to seven cars in front of me so I had time to get out of the car and take pictures of the international boarder between Canada and the US.  When it was my turn, the custom officer asked me if I was carry $10,000 in cash, my answer was of course was NO.  His question back was why not, I just gave him I cannot believe you said that look.  A few more questions about my profession, where I was going and only then, I was allowed to pass back into the US.  I drove straight through to Tok and found I place to slay.  I spent 13.5 hours on the road and I was ready to call it a night.

Alaska US - Canadian Border on the Alaska Highway
The next day I traveled along the Tok Cutoff and Glen Highway following east side of Wrangell-St Elias National Park until I reached the Glennallen, Alaska, here I turn southeast to Palmer before traveling the last miles to Anchorage my father’s home town.

Alaska, Here I come!

Monday, May 27, 2013

Stewart-Cassiar Hwy North of Bell II to Rancheria Lodge on the Alaska Hwy


A bridge crossing just north of Bell II.
Bear Scat: It was hard not to step in it
there were so many piles
On July 9th I woke early again, packed up camp and stop to use the shower before hitting the road.  It was misting rain on and off during the morning.  The clouds were hanging in the trees and beautifully framed the mountain peaks I made many stops along the road to admire the view.  During my stops I found many signs of bear in the area, the gravel turnoffs were scattered with dried bear scat at least I hope it was.  You need to watch where you were stepping there were so many piles.
A black bear eating dandelions north of Gnat Pass Summit.  This is my favorite picture from the whole trip.  I spent
40 to 60 minutes sitting in the car taking pictures hoping for a shot like this.
From my readings about the Stewart-Cassiar Hwy, this is the place to see bears.  On the first day up the road I saw 4 black bears; one of the bears was dead along the road side and the rest did not stick around to be photographed.  Luckly that changed on the second day I had the pleasure to see several more bears and one bear was nice enough sit to along the road side eating dandelion seeds.  Earlier in the morning I saw a lynx casually trotting across the road looking for breakfast.  It was a treat to view it since they are shy creatures.  I did not even try to reach for my camera since he was on a mission and in no mood for pictures.  It was a real privilege just to see a lynx since they are rarely seen.
Burrage River
This remote wilderness highway will soon be lost to civilization.  Between Bell II and the Devil River a transmission company is logging along the east side of the road and putting up transmission wires.  Electricity means that more people can now can live much more easier in the back country and meaning less space for the wildlife.  Bears will be nothing more than a nuisance and the lynx will disappear.  If you want to look across the land without seeing human civilization intruding on it you should drive this road sooner than later.  It will be gone very soon.

Loons on Kinaskan Lake
About 8:30 AM I pulled into Kinaskan Lake Provincial Park and inspected campgrounds before stopping at the boat launch.  There were loons swimming near the docks, so I patiently sat on the dock hoping the loons would swim closer to me.  I took many pictures and some very nice.  It was about an hour before someone drove up with a boat to launch.  It was a nice peaceful hour enjoying the loon and the misted filled lake before I decided to move on.  Just north of the park is where I saw the lynx crossing the road.
Rest Area to the west of Eddontenajon Lake
Eddontenajon Lake

Between Kinaskan Lake Provincial Park and Dease Lake is Gnat Pass, this is the highest point on the highway at 1,241 meters (4,072 feet) above sea level.  Soon after reaching the summit I stopped to view the black bear eating dandelion seeds.  Dease Lake is where I stopped for lunch.  I ate at Mama Z Restaurant the food was delicious and service was good.

Some more of Eddontenajon Lake
Pullout between Eddontenajon Lake & Upper Gnat Lake
Upper Gnat Lake
Gnat Pass Summit: The highest point on
Stewart-Cassiar Highway (Hwy 37).

Dease Lake

I hit the road again soon after lunch and stop a Cottonwood River Rest Area and watched a group of woman fishing.  Not far north of the river is Jade City, where you can buy carved jade jewelry and other items from the family who owns the near by mine.  I enjoyed wandering through the store but passed on buying anything.   Again it was time to get in the car and keep driving north to the Alaska Highway.  I made several rest stop and one of them was at Lake Boya Provincial Park.  The lake has a lovely aqua blue color which is from the light reflecting off the marl bottom. 
Cottonwood River: Northbound Rest Area
Canadian Burnet at Cottonwood River Rest Area


Aeroplane Lake north of the village of Good Hope Lake.
American Vetch found at Aeroplane Lake.


Aeroplane Lake: Showy Locoweed or Showy Crazyweed
Scientific Name: Oxytripis splendens
Boya Lake
Boya Lake: I wished I had time to take a swim.  It just looks wonderful.
Blue Lakes was my last stop on the Stewart-Cassiar Highway.  You are looking at past damage from a forest fire.
I finally reach the Yukon Territory at 5:19 PM and Alaska Highway was just another 5 minutes away further north.  Once I reached the highway I turned northwest and started to look for a place to eat and sleep for the night.  I stopped at the historical Rancheria Lodge for the night.  The food was terrible and the campsites were OK but the outhouse looked like it had not been cleaned in weeks. 
The people running the place lost their electricity in the June 2012 flash flood.  They were running on a generator but the bath and shower room was closed but that is no reason for not having someone cleanup the outhouse daily and I did not expect gourmet food but it should taste good.

Lake behind Rancheria Lodge


Rancheria Historical Marker

Acetic Lupine at the lodge


Pickly Rose


Drawf Dogwood Bunchberry


I woke to rain around 3:30 and quickly pull and packed the tent.  I was on the road by 5:00 AM on July 10th.  The 10th was my longest day, I traveled from Rancheria Lodge to Tok, AK that day and this will be my next post.